Monday, April 25, 2011

Even More Cakes


More Cakes...


So not all of the pictures fit in the last post.

Cakes I Have Made


So I enjoy making cakes--it takes a little while to do, but they turn out really cute! Enjoy! Some were made recently, but some were made a while ago. PS some of them I made with my sister.

Easter Craft


We made some pretty stellar Easter Egg Topiaries as a center piece.

Here is how:
1. Get supplies--Paper Mache Eggs, Tissue Paper, Elmer's Glue, Skewers, small planting pots, paint, floral foam, raffia
2. Ready your supplies: paint your planting pot, cut your tissue paper in small squares, poke skewers through the bottom of the egg.
3. Glue tissue papers one at a time onto the eggs. Use another skewer wrap end with tissue paper square, dip in glue and paste to the egg. Its best to start at the bottom of the egg.
4. Continue until you are done covering the entire egg.
5. Put the floral foam into the bottom of the pot, put the skewer into the foam cover with rafia and hooray you are done.


Way cute, but each egg takes around an hour + to finish.

Idea from Twiggle Box.

Saturday, March 26, 2011

Cheese Crackers


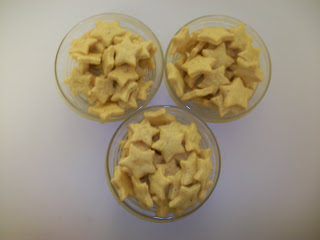
I made homemade Cheese Crackers. I know, amazing! It wasn't too hard, but honestly the cost was about as much as just buying some cheese-its, or goldfish. They do taste better and are more healthy, so there you go.

Cheese Crackers
  • 1 cup all-purpose flour
  • 4 tablespoons cold unsalted butter, cut into small pieces
  • 8 ounces grated extra-sharp Cheddar cheese
  • 3/4 teaspoon salt
  • 1/2 teaspoon fresh-ground pepper
  • 3-4 tablespoons of water to be used later
1. Pulse the flour, butter, cheese, 1/2 teaspoon salt, and pepper together using a food processor until the mixture resembles coarse meal.
2. Pulse in 3 to 4 tablespoons of water, one tablespoon at a time, and only enough so that the dough forms a ball and rides the blade.
3. Remove, wrap in plastic, and chill for 20 minutes or up to 24 hours.
4. Heat oven to 350° F.
5. Line 2 baking pans with parchment paper and set aside.
6. Roll the dough out to 1/8th-inch thickness. Cut out as many crackers as possible using a 2-inch cutter or your choice. I used a star. Remove, wrap in plastic, and chill for 20 minutes or up to 24 hours.
7. Place them 1 inch apart on the prepared baking pans.
8. Bake until golden and crisp ‑- 15 to 20 minutes.
9. Transfer to a wire rack to cool.
10. Repeat with remaining dough and scraps
11. Store in an airtight container for up to 1 week.
12. ENJOY!


This is taken from Yum Sugar.

New Blog

So I have decided to start a personal blog of some adventures and records of what I am doing in life. Nothing much, but something. I am eager to try to recipes and show off some crafts as well as just tell whats going on. :)